Excel techniques with ShufflePoint
Working faster
Rather than repeat then "new query" steps for additional queries, use this shortcut: copy an existing web query.
First, select the cell range of the first query result table, select "Copy" from menu or context menu
Select a new cell (make sure there is room below), and then "Paste".
Change the query parameter's cell reference. Right-click a cell in web query result table. Choose "parameters...", then "query".
Select a different query cell location
Working really fast
Want to save even more clicks? Have a look at this blog post which provides global macro you can use to automate the process of adding queries.
Refreshing all queries
When you open your spreadsheet with Excel at a later date, click Data / Refresh All. This will refresh all the queries with the latest data.
Refreshing a single queries
Right-click the top-left cell of a query result table. Select Refresh Data from the context menu. The data for the selected query table will refresh.
Managing Query Profiles and Timeframes
The defaulting logic in queries can be a bit confusing. So here they are in a nutshell:
- Rule 1: If a query contains a profile or timeframe, then that profile or timeframe will be used to satisfy the query.
- Rule 2: If a query has the word “default” in place of the profile or timeframe, then the cell referred to for the IQY parameter for the profile or timeframe will be used to satisfy the query.
- Rule 3: If a query has the word “default” in place of a profile/timeframe, and the cell referred to for the IQY parameter contains “default”, then the session defaults selected on the "Select Query Defaults" page will be used to satisfy the query.
Thus there is a three-level precedence model for profiles and timeframes. And here are some suggestions on how to make use of these rules for your reports.
- In general, it is best to NOT use specific profiles or timeframes in queries. Instead use "FROM default" and "TIMEFRAME default" in the query and reference cells containing these parameters.
- Our strong suggestion to ease the creation, reuse, and ongoing maintenance of Excel reports it to create a “Settings” sheet as the first sheet in the workbook. Place in that sheet all of the keys, profiles, and timeframes for the queries which will be present on other sheets in the workbook.
- For a monthly report, the majority of queries will probably have a timeframe of "lastMonth". You may be tempted to just hard-code the timeframe in the query. But by specifying "default" in the query, you could change the report to be for the month before last by changing the timeframe parameter to "lastMonth2".
- You do not have to limit yourself to a single timeframe parameter. For example in your monthly report you may have several trendline queries which use a timeframe of "fullmonths:6" to get the last 6 months of metrics. Add another parameter row to your settings sheet with the label "Trend timeframe" and the value "fullmonths:6".
Changing the access key
For this first tutorial, you generated a global or un-scoped key. The queries used in this report can access any profile under any account visible using the credential to which you granted ShufflePoint access.
You may wish to delegate report definition or refresh to a business department (if you are an in-house web analysts) or a customer (if you are a web analytics consultant with many clients under your GA credential). Scoped access keys allow you to control who can query or refresh what data. The key generation page contains a tree view of available GA accounts, web properties, and profiles. When generating a scoped key, select from the tree the desired scope and then click the "Generate Key" button. Paste this key into the key cell of a report. Recipients/maintainers of that report will only be able to query profiles below the selected scope entity.
Preventing report refresh
If you do not want a recipient of the spreadsheet to be able to refresh the report, delete the contents of the key cell before delivering the report.
External Data Properties dialog
If you click on the "Data Range Properties" button in the data toolbar (or select from query context menu), Excel will popup the “External Data Properties” dialog show below.
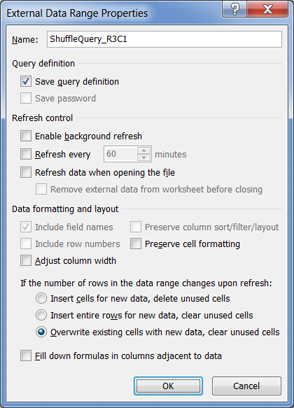
The screenshot above shows are recommended settings.
A good review of the settings in this dialog can be found here and here. Some of the settings you may wish to review include:
- Name
- The named range created with the table. When you create an external data range, Excel automatically creates a named range that covers the table. You can type a new name here which changes the named range.
- Adjust Column Width
- Checked, this causes the column widths to adjust to the data on refresh. Unchecked, the column widths stay the same.
- "If the number of rows..." (Data Range properties)
- These options determine how the range is updated when the data changes and can affect how other data in your spreadsheet is handled. See the second link above.
- Fill Down Formulas
- If you put formulas in the column adjacent to the table, the will expand and retract as the range does. You aren't limited to one column.